
EEG LAB
Contents
- 1 Introduction
- 2 Preparing to experiment
- 3 Experimenting
- 4 Computer systems
- 4.1 Hardware Gallery
- 4.2 Stimulus computers
- 4.3 Stimulus computer software
- 4.4 Stimulus Presentation Hardware
- 4.5 Acquisition computers
- 4.6 Acquisition computer software
- 4.7 Acquisition computer hardware
- 4.8 EEG acquisition hardware
Introduction
The EEG Lab is located in the basement of Luisenstraße 56 (Haus 1) at Berlin School of Mind and Brain, Humboldt Universität zu Berlin. The lab is equipped with hardware & software for running electrophysiology experiments. Access to the lab is granted by permission only. Please see the list of contacts to request access. If you plan to do so, you should download and review the "Fire Protection" presentation and the "Safety Protocol" document located in the wiki sidebar. You must print and sign the "Safety Protocol" document and return this to one of the Administrators responsible for granting access to the lab.
This wiki entry is a comprehensive introduction to the EEG Lab, including important safety information, how to schedule time in the lab, mandatory lab practice, and the current hardware and software available in the lab. Mind & Brain members are strongly encouraged to read the entire wiki entry. Failure to follow mandatory lab practices could result in denial of access to the facilities. Finally, the EEG Lab is constantly updating and maintaining the hardware and software available to researchers. To stay up-to-date with the current developments, please refer to and use the EEG Lab Log.
Location
Google Map
The Berlin School of Mind and Brain,
Humboldt Universität zu Berlin,
Luisenstraße 56 (Haus 1)
10115 Berlin
Germany
Map of Basement

Lab safety
Emergency Contact
The EEG Lab is equipped with a standard telephone. Important numbers are listed next to the telephone. To make a call within the building, you do not need to use the 2093 prefix.
For fire, acute illness, or other serious emergencies:
- General emergency telephone: 112
- First aid: 1706 (Annette Winkelmann)
- Building security: 6000 or 0173/889867
- Alarm hotline: 2416
For external calls, you must dial a 0 before the number you wish to call.
Mandatory safety practice
You must read the following section before inviting any participant to your experiment.
The participant's safety is your top priority. Please follow these rules at all times:
- Never leave a subject or patient unsupervised in the lab.
- Familiarize yourself with the basement labs map (see above).
- Check access to the emergency exits. In the event of a fire or other disaster, you should be able to escort your participant safely and swiftly to an exit.
- Be certain that you know how to telephone people in the building and outside the building.
- Participant's may not enter the EEG chamber without signing a consent form.
Food and Beverage
You may bring food/beverage into the lab, but do NOT bring them inside the EEG chamber. Water for subjects is ok. There are plastic cups in the cupboard.
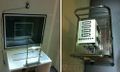
Monitoring the EEG chamber
The lab is equipped with a two-way intercom system, and a webcam directed into the EEG Chamber. Instructions for using the intercom here. Instructions for turning on the webcam can be found here.
Preparing to experiment
This section will help you to familiarize yourself with the mandatory practices of the EEG Lab.
Creating Experiments
You must create a record of your experiment in the Online Participant Recruitment System. This system is available to all Mind and Brain researchers. The system makes it easy to recruit participants for experiments, and schedule sessions in the labs. Please use the links listed under the "Participant Recruitment" header in the Wiki sidebar to learn more about the Database.
Scheduling Sessions
You must schedule sessions of your Experiment in the Participant Recruitment System. If you do not have access to the system, please review the "How to" section under the "Participant Recruitment" header of the Wiki sidebar.
Once you have confirmed sessions for your experiment, you are all set! Good luck.
However, there may be times during which your scheduled sessions are not filled with participants, or participants have not shown up. In this case, there are some common-sense rules for what you should do with your sessions on the private & public calendar. These rules are meant to help insure that the EEG Lab resources are not under-utilized because of booked sessions that are unattended.
Rules for scheduled sessions
Please review the "How to" section under the "Participant Recruitment" header of the Wiki sidebar to learn about the changes to sessions you must implement in the Recruitment system discussed below.
(1) if you have back to back sessions scheduled on a single day, and you have NO participants scheduled, and you wish to keep your time in the lab, then you must change your lab time in the System to "non-experimental".
(2) if you have back to back sessions scheduled on a single day, but you have NO participants scheduled, and you do not wish to keep your time in the lab, then you must remove your laboratory time in the System.
(3) if you have back to back sessions scheduled on a single day, but there are only SOME unfilled sessions, if you do not wish to keep your session time, then you must remove your session time in the System.
(4) if you have back to back sessions scheduled on a single day, but there are only SOME unfilled sessions, and you do wish to keep your time in the lab, then you must change your lab time in the System to "non-experimental".
(5) if you have a no-show participant, then you must mark this fact in the System.
In general, please try to do implement these rules as soon as you know there are changes to your lab session time. Accurately reporting and categorizing your lab time, and making a log of participant arrival, will help you in the long run when you finish your experiment and you want to determine how effective your recruitment was, and how much time you spent actually experimenting (among other benefits).
Experimenting
Once you have scheduled and confirmed participants, you will likely run into one or more experimenters using the lab. To prevent conflicts, please leave the room in the state described in this section.
Quick Guide
The lab should look like this when you leave:

Clean outside 1
Clean outside 2
Clean inside


In addition to cleaning up after yourself, please take note of the following rules:
- You must mark your presence in the EEG Lab in the Laboratory Notebook located on the (physical) desktop. The lab notebook is a legal document. It is imperative that you use it.
- If you encounter any problems in the lab, technical or non-technical, with hardware or with software on the systems, please write a descriptive statement of the problem and any actions you took to resolve the problem in the EEG Lab Log located on the MB Wiki. You should include the date, your name, and any information that will help debug the problem. Take a look at the current log for examples.
- Please do not make any permanent modification to the EEG lab. This includes altering any hardware connections, or changing any software settings without being sure that these changes can be easily reversed.
- It is better to take your equipment with you when you leave the lab. If you must leave things in the lab, place them in the closet and clearly label each item so that they are not misplaced or "borrowed".
- To label items in the lab, use the labeling device or use a marker to write on tape. In other words, do not write directly on objects.
Coming & going checklist
Storage of electrodes and caps
- electrodes: on the hook (Plexiglas), sets (64 or 128 electrodes) should be placed together
- caps: on the correct and labeled Styrofoam heads
- cape: on the hook
Outside work desk
- All Monitors & PCs should be turned off when you leave the lab.
- The desk should be left tidy.
- The remote control for monitor switch is under the CRT monitor stand.
- The infrared sensor for monitor switch is under the CRT monitor stand.
- The intercom should be switched off when you leave the lab.
Inside Faraday cage
- Turn off the ventilation when you leave the lab.
- Turn off the camera when you leave the lab.
- If the desk was re-positioned, please return it to its original place.
- The desk should be left tidy.
- Please disinfect the chin rest before and after use.
Bio-semi amplifier
- The amplifier should be turned off when not in use.
- The blue battery cable should be unplugged when not in use.
- Please exchange and charge uncharged batteries.
Hygienic practice
- Leave the sink, counter, and shelf tidy.
- Please rinse the sink and pull any gunk out of the drain after your participant washes.
- Report or refill empty towels and/or shampoo inventory.
- Unplug the hair drier and leave it on the hook or shelf
- Leave wet towels on the hook to dry, and place dry ones in the laundry basket.
- Do not leave waste next to the sink.
- Take out the trash and replace bag when full.
- Syringes are one-time use only! It is unhygienic to use the same syringe on the heads of different participants! Throw out your syringe after use and please report low inventory!
Sink Pump
Water is drained from the sink via an electric pump.

PTrap


Proper care for the pump will insure that the lab smells fresh.
Trouble shooting the sink pump
- Do not remove all the water from the pump basin. If you remove all of the water from the basin, then the pump may get an air-lock, which will break it.
- The water standing in the pump's basin may become dirty. Fill a bucket with clean cold water and pour it into the pump basin. Let the pump remove the water, and repeat until the water inside the basin is clean.
- Soap scum from shampoo can build up on the sides of the pump basin. Clean the soap scum from the sides of the basin with a sponge, or run medium hot water through the pump until clean.
- Water in the P-trap may dry up, allowing sewer gas inside the waste pipes to enter the lab. If so, air out the lab and run fresh water through the sink.
Computer systems
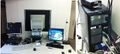
Hardware Gallery
The hardware components and their connections are shown in Figure 1 of the gallery below. Before operating the computers, you should acquaint yourself with the set-up in Figure 1. Furthermore, a trained lab member should show you each component in the set-up, and how it works. Please do not unplug connections, change settings, or (re)move hardware without documenting your changes in the EEG Lab Log.
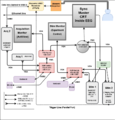
Fig 1. Hardware wiring.

Fig 2. Complete set up.
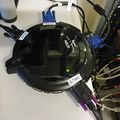
Fig 3. 8 VGA in 1 VGA out (to CRT)
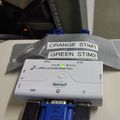
Fig 4. Keyboard Video Mouse switch (Stim1&2)
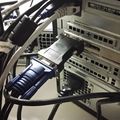
Fig 5. DVI to VGA: Acq2
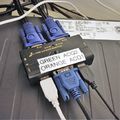
Fig 6. KVM switch 2 (Acq1&2)
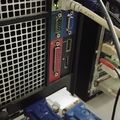
Fig 7. Parallel Port (Stim1)
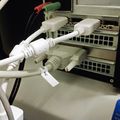
Fig 8. Parallel Port (Stim2)
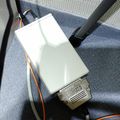
Fig 9. BioSemi Receiver
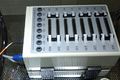
Fig 10. BioSemi Amplifer


Computer names
There are four computer towers in the EEG Lab. By convention, the computers are given the names:
- Stim1
- Stim2
- Acq1
- Acq2
The computers are all labeled clearly. The rest of this wiki will use the above naming conventions to discuss the computer capabilities.
Stimulus computers
- Press power on one of the stimulus computers
- Select the appropriate input on the KVM switch (Green = Stim2, orange = Stim1) (see Fig. 4)
- Select the appropriate input on the 8 in 1 out VGA selector (Green = port selected) (see Fig. 3)
Inside Stim 1
Stim 1 is a Dell Optiplex 760 32 bit PC. Basic specifications for the computer are available here. The computer has an Intel Core 2 duo CPU operating at 3.00GHz. We currently only have 4GB of RAM installed. The computer uses a ATI Radeon HD 5500 graphics card for displaying stimuli. Note: if the link to the .pdf for the Radeon HD 5500 is broken, a copy of the manufacturer's documentation is located on Stim 2 in the folder, C:/Computer Info/old computers.
Inside Stim 2
Stim 2 is a Dell Precision Tower 3620 64 bit PC. Read the manufacturer's documentation here.
Stim 2 has an Intel Core i7-6700 CPU operating at 3.40GHz. There is currently 32GB of RAM installed. The computer has two graphics cards, an integrated Intel HD Graphics 530, which is very limited, and a NVIDIA Quadro M2000, which is the main graphics card used for displaying stimuli.
Stim 2 has a dedicated directory for saving important information (and code) about the computer set-up: C:\Computer info\. Please keep this directory clean from clutter. There are README.txt files in all of the subdirectories. Please read them, and please create your own if you make new directories!
Stim 2 Harddrive. Storage space is limited on Stim 2. The computer currently has 250GB of storage space allocated to the C:\ partition with an additional 250GB of unallocated, contiguous space also on the C:\ drive. The unallocated space may be used (in the future) for an alternative operating system, or for extra storage space. A convenient resource for allocating the unallocated space is located here.
The experimenter's view
The two stimulus computers share a single keyboard, monitor, and mouse for experimental control outside of the Faraday cage. This is made possible with the Keyboard, Video, Mouse (KVM) switch shown in Figure 4 of the Hardware Gallery above. To use Stim2, set the light on the KVM switch to green. To use the old, Stim1 computer, set the light on the KVM switch to orange. Do this as soon as you power up the PC.
Stim1 and Stim2 also share the same Ethernet connection via a router. The Ethernet cable from the wall goes to the first port on the router. Stim2 connects to Port 2 on the router, and Stim1 connects to Port 3 on the router.
The participant's view
Stim1 & Stim2 send video output directly to the 8-in 1-out VGA selector (Figure 3.). The VGA selector sends a video signal from one of its ports to the CRT monitor facing the participant inside the EEG Chamber.
The VGA selector ports (Fig 3) will light up if there is an available video signal. A green light indicates that the port is selected.
Press the "Port Up" or "Port Down" button on the VGA selector to select a specific video input. The input ports on the selector are clearly marked with the name of the computer whose VGA line is attached. The port will show a green light when selected. Available ports appear as orange. Note that there are only three ports occupied on the selector.
Stimulus computer software
The experimenter's view
Setting the CRT Monitor
The Samsung SyncMaster CRT monitor is the primary monitor for displaying stimuli to participants. Some of the basic checks you should perform on the monitor are depicted in Figures 1-4 of the gallery below.
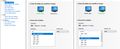
Fig 1. Nvidia Control Panel - Stim 2
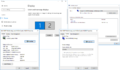
Fig 2. Windows Display Settings - Stim 2, Mon 1
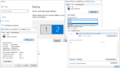
Fig 3. Windows Display Settings Stim 2, CRT Mon
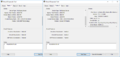
Fig 4. Windows DXDiag.exe settings


Nvidia Control Panel
Figure 1. above shows the Nvidia control panel settings. To check these settings,
- Right click on Stim 2 desktop, and click Nvidia Control panel
- Confirm both monitors are appearing as named
- Click on Change Resolution for SyncMaster
- Confirm resolution at 1280 x 1024 @ 85hz
Troubleshooting CRT resolution If the Samsung SyncMaster CRT monitor is not appearing by name in the Nvidia control panel, then you can try to upload the EDID for the device manually. From the Nvidia control panel, click on View System Typology, select the second monitor, and upload the EDID file from C:\Computer info\Monitors\syncmasterEDID.txt
Windows Display Settings
Figure 2. above shows the Windows display settings. To check these settings,
- Right click on desktop, click on Display Settings
- Confirm the resolutions of monitor 1 (1280x1080 @ 60hz) and the CRT monitor (1280x1080 @ 85hz)
Windows DXDiag.exe
Figure 3 above shows a the DXDiag user interface settings.
If you experience problems with Psychtoolbox displaying stimuli on the wrong monitor, then check whether Windows has mixed up the monitors in DXDiag.
- Click on the start tab and type, dxdiag.exe and click enter.
- Confirm the resolutions of monitor 1 (1280x1080 @ 60hz) and the CRT monitor (1280x1080 @ 85hz).
- If the device order is mixed up, you can either contact a sys admin, or if you are familiar with the Windows registry, then you can delete the mixed up registry so long as the correct registry is available.
Testing the CRT monitor
Biosemi Photosensor
A guide to using the Biosemi Photosensor is located on the MBWiki here.
The path, C:\Computer info\matlab\photoDiode, on Stim 2 contains the scripts required for running the tests.
- sensorAnalysis.m
- stimulateSensor.m
- Testing monitor.docx
- OpticalSensor.cfg
Important! C:\Computer info\matlab\photoDiode contains important scripts for running tests on the timing of the monitor refresh rate and sending of triggers. Do not delete it!
Test Refresh Rate with PsychToolBox
The path, C:\Computer info\matlab\monitor, contains a script for checking the Vertical Blank Interval with Psychtoolbox. Please see the documentation in the file for use.
- refreshRateTest.m
Calibrate the CRT monitor color
A ColorCAL MKII Colorimeter was used to produce a color look up table for the Gamma correction of the CRT monitor. The CLUT is available under the path, C:\Computer info\matlab\colorCal\ourCal.mat.
If the ColorCAL MKII Colorimeter is available, the script, C:\Computer info\matlab\colorCal\rgbscreencalibration.m can be used to calibrate all three guns of the CRT monitor.
Sending Triggers
Stim 2 is configured for running experiments in either Matlab (Psychtoolbox) or Python (Psychopy). You can find descriptions of sending triggers in both formats below.
Matlab Triggers
The trigger functions for matlab are located in the path, C:\Computer info\matlab\triggers. The most important files here are the .dll and the .mexw64 files. You can read about these files on the website, http://apps.usd.edu/coglab/psyc770/IO64.html
Important! **The Matlab path includes C:\Computer info\matlab\triggers. Do not delete or move this folder.**
In general, you do not have to copy these files into your experimental path on Stim 2 in the EEG lab. If you want a copy of the files for your personal use elsewhere, please take the duplicate zip folder containing the triggers from the directory, C:\Computer info\EEGLabTriggers. Each Matlab function is explained below.
OpenTriggerPort.m
- Takes no arguments.
- Reads your current working directory and saves it as a variable.
- Switches your current working directory to C:\Computer info\matlab\triggers\ for access to the .dll and .mexw64 drivers
- Initializes the parallel port (pport) with the drivers, and, if successful, returns the string, '64-bit Windows, InpOutx64 driver is open'. If unsuccessful, it returns, 'inp/outp installation failed!'.
- Example: OpenTriggerPort();
StartSaveBDF.m
- Takes no arguments.
- Sends a trigger to the Acquisition computer telling it to start saving the EEG recording.
- PauseOff in your Biosemi cfg file must be equal to 254 (see here for an example Biosemi configuration file).
- Example: StartSaveBDF();
SendTrigger.m
- Takes two arguments, byte and triggerduration.
- byte is the decimal notation of the binary value you set on the triggers (i.e., 1 corresponds to stimulus 1, 2 to 2, etc. up to 253). See BioSemi https://www.biosemi.com/faq/trigger_signals.htm for more details
- Example: SendTrigger(7, .01); %sends a 10ms pulse with the code 7 to BioSemi Actiview for recording to note e.g. stimulus onset
PauseSaveBDF.m
- Takes no arguments.
- PauseOn in your Biosemi cfg file must be equal to 255 (see here for an example Biosemi configuration file).
- Call this function to pause saving the EEG recording.
- Example: PauseSaveBDF();
CloseTriggerPort.m
- Takes no arguments.
- Call this at the end of your script.
- CloseTriggerPort();
Note that all functions are adapted to be backwards compatible with the Matlab functions used on Stimulus computer 1.
Important! The zip folder in the directory, C:\Computer info\EEGLabTriggers, is a duplicate of the Stim 2 matlab trigger files. You may copy this zip folder to your personal hard drive and take it with you.
Psychopy Triggers
Sending triggers is considerably easier in Psychopy than in Matlab.
Important! The parallel port address is 57336. Use this address when you initialize a parallel port object in Psychopy with pport = parallel.ParallelPort(address=57336)
Similar to Matlab, to send triggers in python you should first set up the pport object with the correct address, then send triggers with trigger durations and clear out the pins on the parallel port. For example,
from psychopy import parallel
pport = parallel.ParallelPort(address=57336)
pport.setData(5)
core.wait(0.01)
pport.setData(0)
The excellent discussion on triggers in Psychopy here may be helpful.
Saving your code and data
Please create a directory for in the directory, C:\mblabs\. Please use your name as your directories title. For example, C:\mblabs\JaneDoe is a very good personal directory; C:\mblabs\MyExperiment864 is a very bad personal directory name.
Please put a README file in your parent directory specifying,
- Your name,
- Affiliation,
- Contact details,
- Current date,
- Status of your experiment: Active, Complete, Discontinued
- And expected completion date of your study - which will be used to determine whether the folder can be deleted or not.
- Notes that will help determine whether the contents of your directory can be removed from the computer.
An example README.txt file to be indexed in your personal directory is available here.
Stimulus Presentation Hardware
CRT Monitor (Inside EEG room)
The EEG Lab uses a 19-inch Samsung Syncmaster 959NF CRT Monitor for displaying stimuli. If the above link for the manufacturer documentation is broken, a copy of the pdf is available on the stimulus computer under the path, C:\Computer info\monitors\959nf_900nf.pdf .
CRT Monitor Quick specs
| General | |
|---|---|
| Display Type | CRT monitor / CRT |
| CRT Type | NaturalFlat - aperture grille |
| Native Resolution | 1920 x 1440 at 73 Hz |
| Controls & Adjustments | Brightness, contrast, H/V moire, H/V position, H/V size, color balance, rotation, trapezoid, degauss, input select, color temperature, parallelogram, pincushion, zoom |
| Dimensions (WxDxH) | 18.4 in x 18 in x 19.4 in |
| Color Temperature | 9300K, 6500K |
| Viewable Size | 18" |
| Pixel Pitch | 0.24 mm |
| Horizontal Refresh Rate | 110 kHz |
| Video Bandwidth | 290 MHz |
| Vertical Refresh Rate | 160 Hz |
| Interfaces | 1 x VGA - 15 pin HD D-Sub (HD-15) |
| Power | |
| Type | power supply |
| Nominal Voltage | AC 120/230 V |
| Frequency Required | 50/60 Hz |
| Power Consumption Operational | 110 Watt |
| Display | |
| Video Bandwidth | 290 MHz |
| Dimensions | |
| Width | 18.4 in |
| Depth | 18 in |
| Height | 19.4 in |
| Projector | |
| Max V-Sync Rate | 160 Hz |
| Max H-Sync Rate | 110 Hz |
Other stimulus presentation hardware
This section is reserved for future additions to the EEG Lab. If you are a researcher, and you would like to add your stimulus presentation hardware to the list, please create a MBWiki account and add your devices!
- audio devices
- other presentation hardware
Acquisition computers
- Press power on one of the acquisition computers
- Select the appropriate input on the KVM switch (Green = Acq2, orange = Acq1) (see Fig. 4)
- Optional: select the appropriate input on the 8 in 1 out VGA selector (Green = port selected) (see Fig. 3)
Acquisition computer software
Acquisition computer software quick tips
The experimenter's view
Acquisition computer hardware
The experimenter's view
The acquisition computer(s) share a single VGA line to the CRT monitor inside, which you read about below.
The participant's view
Inside Acq 1
Inside Acq 2
EEG acquisition hardware
Biosemi quick set up guide
The experimenter's view
The participant's view
TO DO